Linuxサーバ奮戦記 --- sendmail --- (Mod.02Feb2009) >>TOP
Mailサーバの設定
Fedora では sendmail-cf がインストールされていなことがあるので,インストールしておく。
# yum install -y sendmail-cf
# vi /etc/mail/sendmail.mc
・・・・・
dnl DAEMON_OPTIONS(`Port=smtp,Addr=127.0.0.1, Name=MTA')dnl (dnl を前に追加)
・・・・・ |
# m4 /usr/share/sendmail-cf/m4/cf.m4 /etc/mail/sendmail.mc
> /etc/mail/sendmail.cf (1行で入力)
# vi /etc/hosts.allow
以上の設定が完了したら,sendmail をスタート。
# /etc/rc.d/init.d/sendmail start
Starting sendmail: [ OK ]
Starting sm-client: [ OK ] |
デーモンとして走らせておくには,以下の様にする(PCの電源をONにしてから自動で sendmail を起動させることが可能)。
# chkconfig sendmail on
アクセス制限の設定
#vi /etc/mail/access
# Check the /usr/share/doc/sendmail/README.cf file for a description
# of the format of this file. (search for access_db in that file)
# The /usr/share/doc/sendmail/README.cf is part of the sendmail-doc
# package.
#
# If you want to use AuthInfo with "M:PLAIN LOGIN", make sure to have the
# cyrus-sasl-plain package installed.
#
# By default we allow relaying from localhost...
Connect:localhost.localdomain RELAY
Connect:localhost RELAY
Connect:127.0.0.1 RELAY
Connect:192.168 RELAY (接続可)
Connect:yuyuyu.jp RELAY (接続可)
Connect:xxxx.com REJECT (接続不可)
|
# makemap hash /etc/mail/access.db < /etc/mail/access
sendmail のリロードはしなくてOK。
複数ドメインが使えるようにする設定
# vi /etc/mail/virtusertable
ayu1@yuyuyu.jp ayu1_jp
ayu2@yuyuyu.jp ayu2
ayu1@ayu-fishing.info ayu1_info
|
上記の例では,
ayu1@yuyuyu.jp は アカウント ayu1_jp に格納,
ayu2@yuyuyu.jp は アカウント ayu2 に格納,
ayu1@ayu-fishing.info は アカウント ayu1_info に格納
とメールを振り分ける。そのために,予めユーザアカウントとパスワードを設定しておくことが必要(既に存在していれば設定不要)。
# useradd ayu1_jp (ユーザ追加)
# passwd ayu1_jp (ユーザに対するパスワード設定)
Changing password for user ayu1_jp.
New UNIX password: (パスワード設定)
BAD PASSWORD: it is based on a dictionary word
Retype new UNIX password: (パスワード設定確認)
passwd: all authentication tokens updated successfully.
|
# makemap hash /etc/mail/virtusertable.db < /etc/mail/virtusertable
使用するドメインを設定しておく。
# vi /etc/mail/local-host-names
yuyuyu.jp
ayu-fishing.info |
設定完了後,sendmail を再起動。
# /etc/rc.d/init.d/sendmail restart
Shutting down sm-client: [ OK ]
Shutting down sendmail: [ OK ]
Starting sendmail: [ OK ]
Starting sm-client: [ OK ]
|
SMTPS と SMTP AUTH(SMTP認証)に対応させる設定
認証として SASL(Simple Authentication and Security Layer) を使用。
その他,サブミッションポートも使用することも考慮。
Fedora10で以下の設定ではSMTP認証がうまくいかない。Fedora9までは動作するのに…
cyrus-sasl-md5 がインストールされていないといまくいかない。
( yum install -y cyrus-sasl-md5 )
# vi /etc/mail/sendmail.mc
・・・・・
dnl TRUST_AUTH_MECH(`EXTERNAL DIGEST-MD5 CRAM-MD5 LOGIN PLAIN')dnl
dnl define(`confAUTH_MECHANISMS', `EXTERNAL GSSAPI DIGEST-MD5 CRAM-MD5 LOGIN PLAIN')dnl
↓
TRUST_AUTH_MECH(`EXTERNAL DIGEST-MD5 CRAM-MD5 LOGIN PLAIN')dnl
define(`confAUTH_MECHANISMS', `EXTERNAL GSSAPI DIGEST-MD5 CRAM-MD5 LOGIN
PLAIN')dnl
・・・・・
dnl define(`confCACERT_PATH', `/etc/pki/tls/certs')dnl
dnl define(`confCACERT', `/etc/pki/tls/certs/ca-bundle.crt')dnl
dnl define(`confSERVER_CERT', `/etc/pki/tls/certs/sendmail.pem')dnl
dnl define(`confSERVER_KEY', `/etc/pki/tls/certs/sendmail.pem')dnl
↓
define(`confCACERT_PATH', `/etc/pki/tls/certs')dnl
define(`confCACERT', `/etc/pki/tls/certs/ca-bundle.crt')dnl
define(`confSERVER_CERT', `/etc/pki/tls/certs/sendmail.pem')dnl
define(`confSERVER_KEY', `/etc/pki/tls/certs/sendmail.pem')dnl
・・・・・
DAEMON_OPTIONS(`Port=smtp,Addr=127.0.0.1, Name=MTA')dnl
↓
DAEMON_OPTIONS(`Port=smtp, Name=MTA')dnl
・・・・・
dnl DAEMON_OPTIONS(`Port=submission, Name=MSA, M=Ea')dnl
↓
DAEMON_OPTIONS(`Port=submission, Name=MSA, M=Ea')dnl
・・・・・
dnl DAEMON_OPTIONS(`Port=smtps, Name=TLSMTA, M=s')dnl
↓
DAEMON_OPTIONS(`Port=smtps, Name=TLSMTA, M=s')dnl
|
とりあえず,動作していたメールサーバ設定をバックアップ。
# cp -p /etc/mail/sendmail.cf /etc/mail/sendmail.cf.org
# m4 /usr/share/sendmail-cf/m4/cf.m4 /etc/mail/sendmail.mc
> /etc/mail/sendmail.cf (1行で入力)
sendmail.pem の作成
# cd /etc/pki/tls/certs/
You have new mail in /var/spool/mail/root
# make sendmail.pem
umask 77 ; \
PEM1=`/bin/mktemp /tmp/openssl.XXXXXX` ; \
PEM2=`/bin/mktemp /tmp/openssl.XXXXXX` ; \
/usr/bin/openssl req -utf8 -newkey rsa:1024 -keyout $PEM1 -nodes -x509 -days 365 -out $PEM2 -set_serial 0 ; \
cat $PEM1 > sendmail.pem ; \
echo "" >> sendmail.pem ; \
cat $PEM2 >> sendmail.pem ; \
rm -f $PEM1 $PEM2
Generating a 1024 bit RSA private key
.++++++
..++++++
writing new private key to '/tmp/openssl.uu7229'
-----
You are about to be asked to enter information that will be incorporated
into your certificate request.
What you are about to enter is what is called a Distinguished Name or a DN.
There are quite a few fields but you can leave some blank
For some fields there will be a default value,
If you enter '.', the field will be left blank.
-----
Country Name (2 letter code) [GB]:JP
State or Province Name (full name) [Berkshire]:kyoto
Locality Name (eg, city) [Newbury]:kyoto
Organization Name (eg, company) [My Company Ltd]:yuyuyu
Organizational Unit Name (eg, section) []:ayu
Common Name (eg, your name or your server's hostname) []:ayu.yuyuyu.jp
Email Address []: |
SASL 用パスワード設定
例: ayu.yuyuyu.jp のサーバで ayutomo というユーザに対してパスワードを設定。
# /usr/sbin/saslpasswd2 -u ayu.yuyuyu.jp ayutomo
Password:
Again (for verification): |
saslauthd を起動し,以後デーモンで走らせる。
# /etc/rc.d/init.d/saslauthd start
Starting saslauthd: [ OK ]
# chkconfig saslauthd on |
設定完了後,sendmail を再起動。
# /etc/rc.d/init.d/sendmail restart
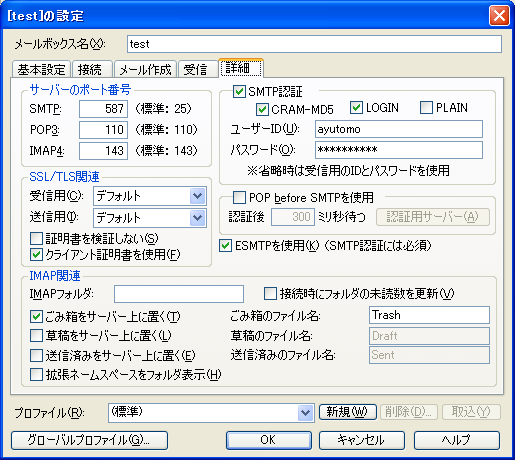
メーラーの設定
自分は Becky! Internet Mail を使っているので,SMTP認証の設定とサブミッションポート(最近はプロバイダーによってはサブミッションポートを設定しないと送信できないことがある)の設定は...
[メールボックスの設定]で[詳細]タブの SMTP:587,SMTP認証をチェック, CRAM-MD5をチェック, LOGINをチェック
ユーザーID:, パスワード:は SASL用パスワード設定したときのに合わせる。
cyrus-sasl-md5 がインストールされていなかったら,SMTP認証のID・パスワードは通常のものと同じにしないとうまくいかない。
|
|